Register as new user and login
When you first open Slide Score you will be greeted with a login form:
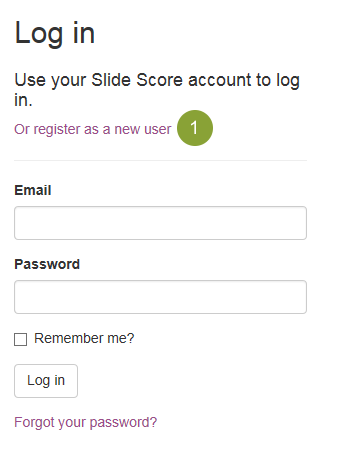
If you don't have an account yet, click the link  to open registration screen:
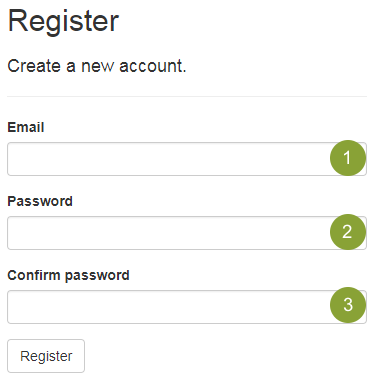
You can enter your email in  - your colleagues will give access to the studies to this email so make sure it's the right one.
Please enter password with at least one non-alphanumeric character (',', '.', '+', '-', '(', '<', ...), digit ('0'-'9') and uppercase letter ('A'-'Z') each.
For example 'password1' is not an acceptable password but 'W!2_>e9TE' is.
Please enter your password in
  and a second time to
  for confirmation.
When done click the "Register" button.
You will get an email with a confirmation button  .
.
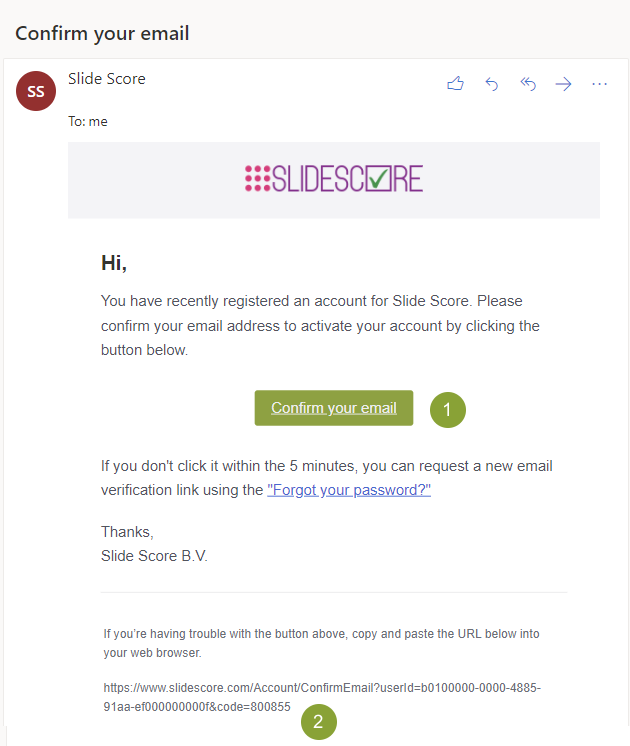
Please click the button, you will be taken directly to the home screen.
If the button doesn't work (web email clients sometimes break buttons) you can copy the confirmation link  and paste it into your browser. Please make sure you have copied the whole link.
If your account has access to sensitive data you might want to set-up two-factor authentication.
Score your first slide
In Slide Score slides are organized into studies - sets of images that logically belong together and need to be scored with the same criteria. You can learn more about how to organize them in the Administration section.

The home screen shows the list of studies  with their "Score!" buttons
  . Clicking this button will take you directly to the next slide that you need to score from that study.
The header shows the currently logged in user and a link to log out
  . You should always log out when not using Slide Score.
Click the "Score!" button  for "WSS_Demo" study now.
Using the slide viewer
That opens the whole slide viewer of Slide Score:
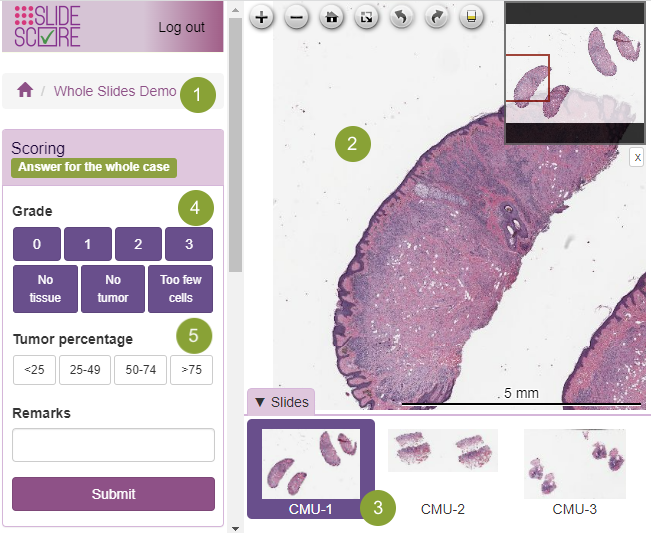
In upper left corner is the navigation "breadcrumb"  with a home button that takes you to the list of studies and a link to the study this slide belongs to.
On the right you see the actual slide  , you can zoom in and out with your mouse wheel, click and drag the view with a mouse or use cursor keys to move around. There is a minimap showing your location on the whole slide and controls for zooming, full screen, rotation and predefined zoom levels. These are only shown when you actively move your mouse over the slide viewer.
If we are looking at a case with multiple slides there will be the slide drawer under the slide  . Click to switch to viewing of that slide instead.
There is a scoring panel with three questions and a submit button on the left side  .
.
Scoring sheets can be easily configured using the question editor. This scoring sheet was configured with an intensity/grade type question, percentage and a free text field for remarks.
You can indicate the grade of the tumor by clicking 0, 1, 2 or 3 on the "Grade" question  . You can also use the buttons "No Tumor", "No tissue" or "Too few cells" if it's not possible to answer this question for one of these reasons. Second question asks for a tumor cell percentage
  . You can indicate the exact percentage (for example 60) by clicking on the appropriate range that includes the exact percentage (in our example "50-74") and then clicking the button with the exact number (60 in our case).
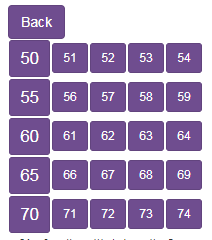
Now we can click the button "60" and that answers this part of the scoring sheet.
The remarks field allows pathologists to share any comments or remarks.
When all the questions are answered
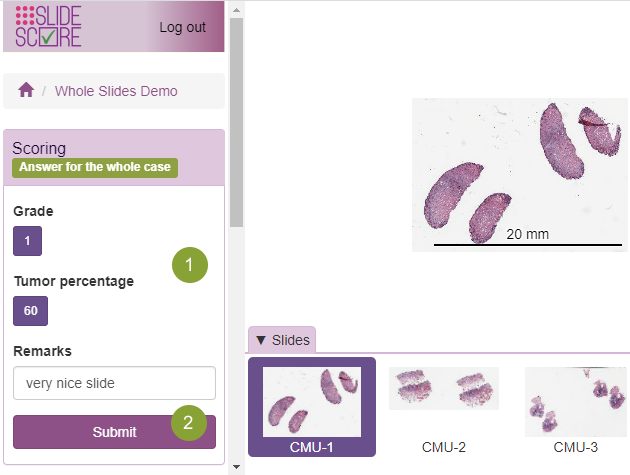
we can review them, clicking the button with an answer  will open the question again and we can change our answer. We can submit the answers by clicking the Submit button
  .
.
Doing that takes us to the next slide in the study that we haven't scored until there are no more slides.
Congratulations on scoring your first slide!
Navigating between slides
You can use the Navigation panel to move to a different slide:

The first field  shows the name of the slide. You can type in the exact name of another slide and press Enter to show that instead.
If you don't know the exact slide name you can move to the previous and next slide in the study using the buttons at
  . The text box displays the position of the currently displayed slide in the study, you can change it and press Enter to jump directly to a slide at a different position. In the example above we are viewing the 4th slide out of 5 in this study.
You can use the last two buttons to go to overview of this study  or the home page with all studies
Score your first TMA
What is a TMA?
TMA (Tissue MicroArray) is a rectangular grid of hundreds of cores - circular tissue samples around 1mm in diameter - on a slide. These cores are so small that things often go wrong and the tissue gets folded or the core gets washed away and the core becomes unusable or missing. That's why there are 3 or 4 cores from the same sample, the duplicates.
TMA map defines which core belongs to which sample. Controls - cores for checking the staining or the orientation - are also indicated on this map.
TMA allows staining lots of samples with fewer antibodies and saves tissue. Slide Score allows you to score them quickly.
TMA Overview
To see a TMA in Slide Score click on the "Score!" button - the one with a checkmark - next to the "TMA Demo" study like we did for the whole slide study in the previous section. Your browser will then show something like this
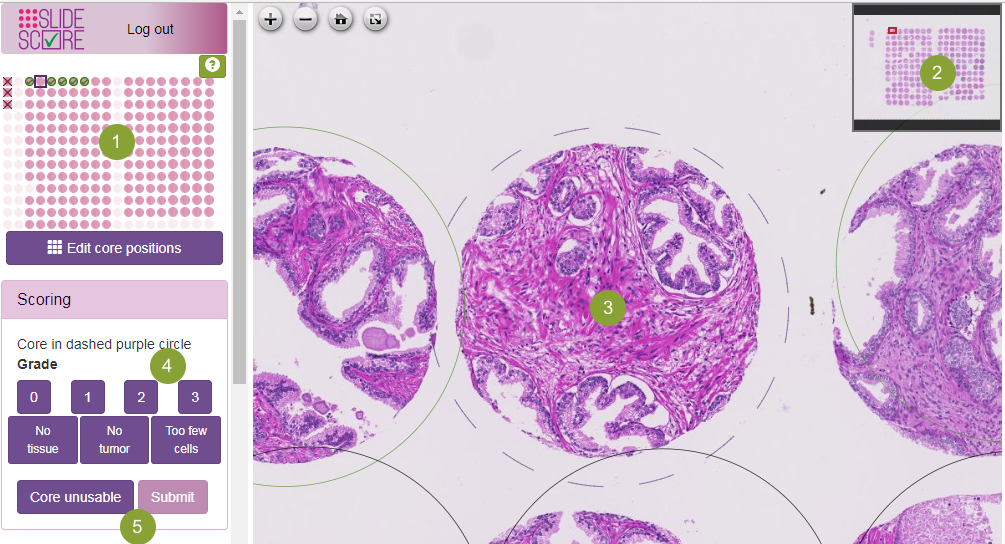
The TMA map is shown in upper left corner  , you can compare it with the actual slide on the overview of the slide on the right
  .
.
You can click a core on the TMA map to select it, that will also move the view to the selected core and zoom in on it.
The selected core is marked with a dashed circle  . If you haven't scored the core yet and you aren't happy with the position of you can click anywhere on the slide to move the center of the core there. Hopefully, it's already been done (see how to place the grid).
You can also click another core to select it and move the view on it.
Filling in the scoring sheet at  is done the same way as for whole slides. There is an extra button
  which you can click to indicate that this core can't be scored because there is problem with it (it's just not there or the tissue is folded, out of focus or obscured).
The green question mark button next to the TMA map  shows the legend and some keyboard shortcuts
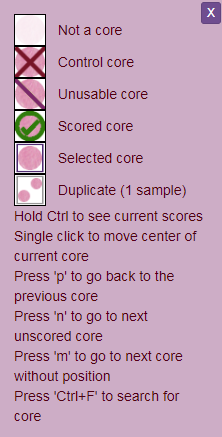
Most important is that the pink circles are cores and they get a green checkmark when you score them. Circles with a red cross are controls which you can't score.
TMA Core Navigation
You can change the selected core by clicking the TMA map, clicking the core on the slide, or by using the TMA Core Navigation panel
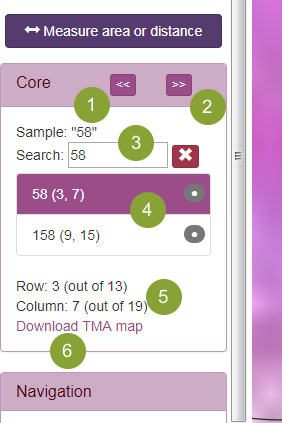
The back button  appears once you have moved between cores at least once. Clicking it will take you to the previously selected core.
The forward button  selects the next core that you haven't scored yet.
You can see the sample identifier of the currently selected core  and the search box under the navigation buttons. If you type (a part of) a sample identifier into the search box Slide Score will display a list of all cores that have a sample identifier containing what you've typed. For example, here we typed "58" and both cores 58 and 158 show up in the search results
  . The search results contain the sample identifier of the core along with its coordinates (in the format: row, column), and an indication whether it has been placed (a dot) or scored (a checkmark). You can click one of the cores to select it and zoom in on it.
Coordinates of the current core  are also displayed, above the link to download the original TMA map
  that you can use to check the map. Note that this link appears only if your study manager has uploaded it.